How To Export My Custom Resolution Video On CapCut Like a Pro
How To Export My Custom Resolution Video On CapCut is something many creators search in 2026. Video quality matters more now. Individuals view contents in large screens, smart televisions, and high definition phones. Your video can be seen blurred or stretched, once you have wrong export setting. That can reduce views and engagement.
CapCut 2026 gives better export control than older versions. You can choose resolution, frame rate, and bitrate. Still, many users just press export without checking details. Honestly, that is the biggest mistake. Learning How To Export My Custom Resolution Video On CapCut properly can improve your content quality in one step.
Well, do not worry. I will explain everything in simple words. No technical confusion. Just clear steps and practical tips that work for daily editing.
Why Custom Resolution Matters in CapCut 2026
Custom resolution gives you full control. Default export settings may not match your platform. YouTube ratios best are 16:9. TikTok prefers vertical 9:16. With a bad proportion in the export, then you would have black bars in your video.
File size and clarity are also influenced by resolution. An increased resolution entails increased detail. But it also increases file size. In my experience, 1080p works best for most social media content. It gives good balance between quality and storage space.
How To Export My Custom Resolution Video On CapCut Step by Step
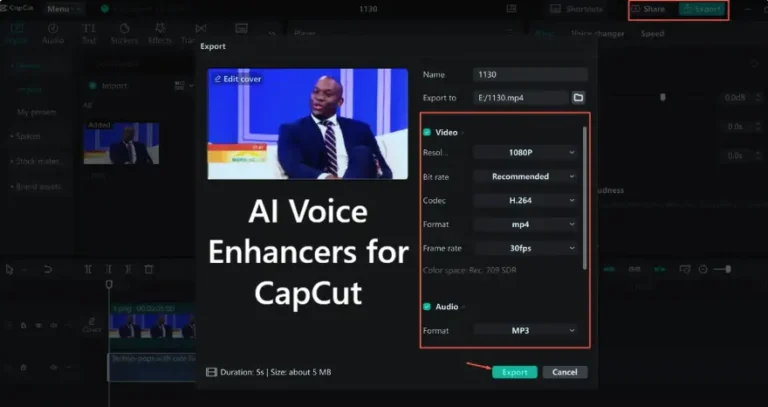
To begin with, open your completed project in CapCut 2026. Be sure that you checked transitions, text and audio. Thereupon, you should choose the Export button on the right-hand side. The resolutions will be offered in the form of a new screen such as 720p, 1080p or 4K.
Now select your desired resolution. In case your device is customizable, make its settings yourself. Select frame rate such as 30fps in case of normal videos or 60fps in case of action clips. Then check bitrate if available. Higher bitrate keeps better detail. Tap Export again and wait until process completes.
Best Resolution and Frame Rate Settings for Smooth Videos
In the posting of videos in You Tube most of the videos may be in 1080p and 30fps. In the case of gaming or sports videos, 60fps will provide a better motion. In case your device is 4K, then it can be used in professional projects.
Bitrate is simple. Think of it as video detail level. Higher bitrate keeps video sharp. But file size becomes larger. I suggest testing short clip first. That way you see final quality before exporting full project.
How To Export My Custom Resolution Video On CapCut Without Losing Quality
You should always use original high quality clips in your timeline. Exporting 720p video in 4K is not going to enhance quality. It only increases file size.
Use official CapCut Pro Download if you need advanced export tools. It provides stable performance and sometimes extra settings. Avoid using CapCut Pro APK from unknown sites. Modified apps may crash during export or reduce output quality.
Common Export Problems and Easy Fixes
Sometimes export stops at 99 percent. This usually happens due to low storage. Clear some space and restart your device. Also close background apps before exporting.
You can check whether you are not using lower resolution or lower bit rate in case the video you have exported becomes blurry. Also confirm aspect ratio matches your project size. Small setting errors create big quality issues.
Free vs Pro Export Options in CapCut
Free version of CapCut 2026 offers many export features. Most users can export up to 1080p without issue. For casual editing, free version is enough.
Pro version may unlock extra templates and advanced tools. But export quality mostly depends on your chosen settings, not only subscription. So focus more on correct configuration than just upgrading.
Conclusion
When you learn the fundamentals then exporting custom resolution in CapCut is easy. There are three primary items that you must confirm, which are resolution, frame rate, and bitrate. It is these settings which determine the appearance of your video once it has been exported.
Always match your export size with platform requirements. Test short clips before exporting long projects. It saves time and storage.
Use official app versions and avoid unsafe downloads. Stable performance is more important than unlocked features.
Now you clearly know How To Export My Custom Resolution Video On CapCut. Experiment with settings, experiment test results and develop. It is sincere that practice makes editing better.
FAQs
- How do I set custom resolution in CapCut?
Open your project, tap export, then choose resolution option. Final export Desired 720p, 1080p or 4K. - Can I export 4K in CapCut 2026?
Yes but it requires the 4K support on your device and the version at the moment is CapCut 2026. - Why is my video blurry after export?
You may have selected low resolution or bitrate. Also check if original clips were high quality. - What is best resolution for YouTube?
1080p at 30fps is ideal for most YouTube videos. 4K is good if you want extra sharp quality. - What frame rate should I use?
Use 30fps for normal content. Gaming or quick motion videos Use 60fps. - Is CapCut Pro APK safe for export?
Modified APK versions can cause bugs and security risks. Official version is safer. - Does CapCut Pro Download give better quality?
Official CapCut Pro Download gives stable export and access to extra features, but quality depends on your settings. - How to reduce file size in CapCut?
Reduce the bit rate to a small extent or use 720p instead of 1080p provided that the platform has a say. - Why export option not showing high resolution?
Your device may not support high resolution or app version is outdated. Update the app. - Can I change resolution after export?
You cannot truly increase quality after export. You must adjust resolution before exporting the video.